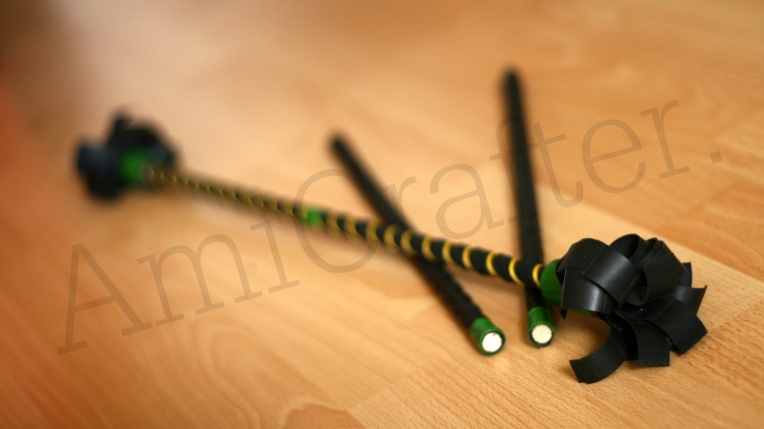
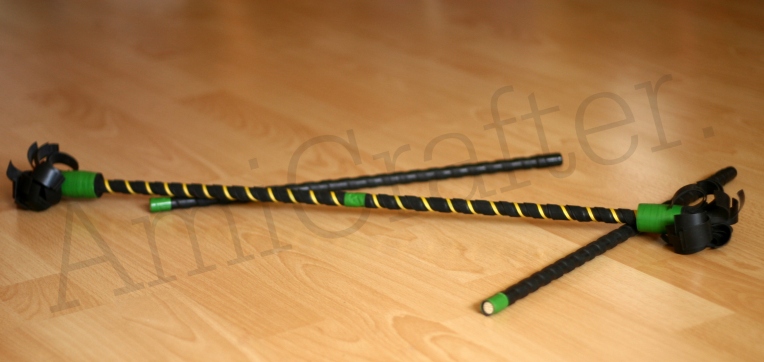
A while ago we had a workshop planned at an outdoor event with my colleagues. This means it was a work thing. The idea was to make flower sticks. We had an EVS volunteer who knew how to juggle them enough to teach as well and I had also googled enough to find out the basics and the equipment needed.
As I actually knew one fellow who had actually made them before, I decided to make him a call. It took a few times but finally I manage to organize a class for the staff so we could spread the skills later on. It was easier than I thought! As it was a bit different from what I had read and looked about I will write the tutorial down here.
What you need:
- wooden sticks (round slats) 1-1.2 mm diameter (from constructions supplies store)
- bicycle inner tubes (free from cycling store – smaller entrepreneurs are more eager to help)
- electrical insulation tape (from constructions supplies store)
- optional – some ribbon for decoration (craft store, fabric store etc)
- scissors
- measuring tape
- a fine sand paper (100 would be the best but I used 60 and it did the job; from constructions supplies store)
Instructions:
- Cut the slats so you have 2 x 40 cm and 1 x 60 cm sticks (you can vary it by your liking but this is what we choose). Sand down the ends if needed.
- Cut the inner tubes – you need 3 long and narrow strips and two shorter and wider ones. After you cut the tire in half lengthwise you should wipe it clean as it has some white powder inside. First the long strips, mine arre 2.5 cm wide. You can follow the lines that most tubes have on them. Just make sure they’re straight and even. Depending on the tube you can get 2-3 strips from one tire. It might be enough to use one strip for the flower stick and the other for your hand sticks but it also depends on the tire and your wrapping. We didn’t get any numbers for measures so you can go and improvise.
- Attach the strip with tape to one end of the stick so that the inside of the tube (that you just wiped clean) would now face outside. Wrap it around in an angle so that it overlaps in around 1/3 of its width. Remember to pull the strip while wrapping – otherwise it wouldn’t stay in place (don’t pull too much at the beginning as it would rip off your tape). My pictures are not the best for this tutorial perhaps but you can see something. It should be 1/3 over the last round, 1/3 in between and 1/3 under the next round. In the end cut the strip off in an angle so it would look even. Wrap some tape around it and just to be sure wrap some tape around the other end as well. Roughen all the raised parts with your sand paper moving it lengthwise the stick. Be careful not to sand too much so you won’t rip the rubber. If it’s your hand stick (one of the shorter ones) you’re done with it and should make another one just like so as well. If not, then read on.
- You can add some ribbon just for fun wrapping it around your flower stick to the lower space which you will have if wrapping correctly. Attach it with tape from one end as you start and the other one when you have finished.
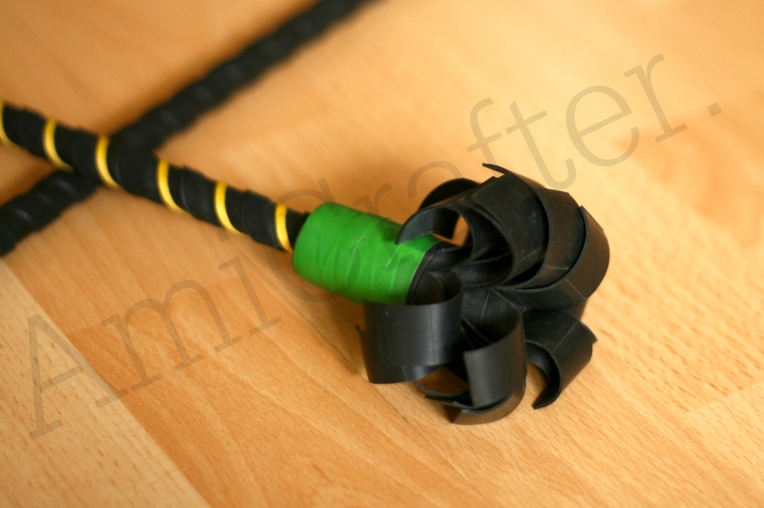
- For the tassels/weights in the end it would be best to use a bit wider inner tube. Cut it lengthwise again and wipe clean. Mine is 10.5 cm wide while cut open. The length again depends on your liking and again the tires. The rule of thumb is it should be the length of your hand sticks so it makes 40 cm (easy to use the stick for measure). Cut the fringe to around 3/5 the width of the strip. One shred I have around 1.5 cm wide. Again you can follow the lines to keep them even length (I had 5 lines in there so I cut 3 to shreds and kept 2 for the edge).
- Wrap them around the ends of your flower stick so the part of your rubber strip that’s in one piece would cover the end of the stick. Make sure you wrap it so it stacks straight upon itself so it wouldn’t be slantwise. You need the full 90 degrees corner it makes on your stick for some tricks. 😉 Again, don’t forget to stretch the tube while wrapping! When finished secure it in place with tape and wrap the tape around like shown in pictures – so it would be covered from the edge until the beginning of the fringe.
- Test the weights – if they’re too heavy the stick will be too fast. You can try and find your liking. To correct just take off the tape, cut off a strip and wrap it again.
- Optional – you can try to balance the stick on your finger to find the balance point and mark it with a round of tape. It’s good for beginners to have.
- Ta’dah, you’re done!
I still a lot to learn with them but at least I now own a pair. And I have enough materials to make at least one more set! ^_^
Veidi aega tagasi oli meil tööjuures planeeritud üks väliüritus, kus pidime osalema töötoaga. Planeerisime valmistada flower sticke ehk selliseid tsirkuse trikipulki. Kuna meil on parasjagu ka EVS vabatahtlik, kes oskab neid piisavalt kasutada, et ka õpetada ning ma olin juba ka mõndagi onu Google käest küsinud ja videosid uurinud, et põhitõed ja vajalike materjalide nimekiri olid juba teada.
Kuna mul tegelikult on ka üks tuttav, kes oskab neid päriselt ka valmistada, otsustasime ta meile igaks juhuks appi kutsuda. Sellega läks paar korda proovimist, aga lõpuks õnnestus ja kokkusaamine toimus. Selline väike koolituse meile, töötajatele, et me siis saaks hiljem oma oskusi edasi jagada. Lõppkokkuvõttes võib öelda, et see oli lihtsam kui ma arvasin! Kuna juhend oli ka natuke teistsugune kõigist Internetiavarustest leitutega, siis jagan seda siin.
Vaja läheb:
- puupulgad (ümarliistud) 1-1.2 mm diameetriga (ehituspoest)
- jalgratta sisekummid (tasuta jalgrattapoest – väikeettevõtjatjad on koostööaltimad)
- isoleerteipi (ehituspoest)
- valikuline – natuke linti kaunistuseks (kangapoest jm)
- käärid
- mõõdulint
- peenike liivapaber (ideaalne oleks 100, me kasutasime 60; ehituspoest saab)
Juhend:
- Lõika liistud nii, et sul oleks kaks lühemat ja üks pikem pulk. Minul on 2 x 40 cm ja 1 x 60 cm, aga võid vastavalt oma mugavusele seda sättida. Otsad lihvi vajadusel siledamaks.
- Lõika sisekummid – vaja läheb 3 pikemat-peenemat riba ja kaks lühemat-laiemat. Esmalt lõika kumm piki pooleks, see järel puhasta niiske lapiga ära see valge puru, mis tõenäoliselt seal sees on. Esmalt pikad ribad, minu omad on u 2.5cm laiad. Hea on jälgida jooni, mis enamus kummidel on. Sellega võib mõõt veidi varieeruda, pole lugu, jälgi lithsalt, et nad oleks enam-vähem ühtlased ja sirged. Olenevalt kummi laiusest saad 2-3 riba ühest kummist. Võib olla nii, et piisab ühest kummist nö käepulkade jaoks ja teisega saad katta trikipulga enda. See oleneb kummist, sinu pulkade pikkusest ja mähkimisest. Meile mõõte ette ei antud seega on see koht improviseerimiseks.
- Kinnita üks pikk kummiriba isoleerteibiga pulga otsa külde nii, et kummi sisemine osa (mille sa just ilusti ära puhastasid) on nüüd väljaspool. Mässi riba nurga all ümber pulga nõnda, et ta kattub umbes 1/3 osas eelmise ringiga. Kindlasti venita kummi mähkimise ajal, et ta hiljem paigast ei liiguks (päris alguses tõmba veidi vähem, et teip lahti ei tuleks). Siinkohal pole mu pildid vist päris piisavad, aga ehk midagi ikka näeb. Riba peaks olema 1/3 eelmise ringi peal, 1/3 jääb vahele ja 1/3 kummi laiusest on eelmise ringi peal. Kui oled mähkimisega lõpuni jõudnud, lõika kummiriba ots nurga all ära, et ta lõpus hunnikusse ei jääks, kui jätkad lõpuni sama nurga all mähkimist. Kinnita ots mässides sinna teipi ümber, kindluse mõttes võid teipi mässida ka teise otsa ümber. Liivapaberiga karesta kõrgemad osad oma valminud pulkadel lihvides piki pulka. Ole ettevaatlik, et kummi katki ei lihvi! Kui tegid praegu lühema pulga, siis said selle hetkel valmis ja peaksid teise samasuguse veel tegema. Kui said valmis pikema pulga, loe edasi.
- Võid lisada peenikese lindi, lihtsalt kaunistuseks, oma trikipulga ümber. See peaks minema sinna tekkinud madalamasse osasse. Kinnita algus teibiga, mässi, kinnita lõpp teibiga.
- Tuttide/raskuste jaoks otstesse oleks parem kasutada mõnda jämedamat kummi. Lõika taaskord kumm pikkupidi pooleks ja pühi seest puhtaks. Minul tuli lahti lõigatult selle laiuseks 10.5 cm. Pikkus sõltub jällegi kummist ning trikimeistri meeldimisest. Rusikareegel oleks, et lõika riba samapikk kui lühemad pulgad – minul oli ta siis 40 cm (hea lihtne, pole vaja mõõdulinti jälle välja otsida). Lõika narmad 3/5 kaugusele kummiriba laiusest (mul oli seal sees täpselt 5 joont, lõikasin neist 3 laiuses narmad ning ülejäänud 2 laiune jäi serv).
- Mässi riba terveks jäänud serva laiuselt pulga otsa ümber. Eriti oluline on, et mässiksid selle otse, et kihid jääksid üksteise kohale, mitte kuidagi viltu! On vaja, et tekiks 90 kraadine nurk pulgaga, seda on vaja osade trikkide tajoks. 😉 Taaskord, ära unusta mässides kummiriba venitada! Kinnita ots taaskord teibiga ning mässi teip, nagu pildil näha – et oleks kaetud kogu serv kuni narmaste alguseni.
- Testi raskuseid – kui nad on liiga rasked, on flower stick liiga kiire. Proovi ja leia endale sobiv. Et raskust vähendada, võta teip lahti, lõika kummiribast ots maha ja mässi uuesti kinni.
- Valikuline – proovi trikipulka oma sõrme peal tasakaalustada. Kui koht käes, märgi see teibiringiga. Alustajatele tuleb kasuks.
- Valmis!
Mul on sellel alal veel palju õppida, aga vähemalt on mul nüüd oma komplekt olemas, pluss veel piisavalt materjali, et teinegi valmis teha! ^_ ^


Äge! Käisin vahepeal Youtube’st videot vaatamas, mida nende pulkadega tehakse. Kas harjutad trikke?
Natuke olen harjutanud, jah. YouTube ongi trikkide õppimisel põhiline abivahend: 🙂